Velixo 6: Easily Hide Zero Rows Anywhere
In our previous blog post, we looked at how Velixo 6’s new functions can help one get rid of the zero rows in their accounts balance reports. It turns out there is another powerful mechanism, and a more generic one at that, for keeping zero rows and columns at bay: anywhere, anytime, regardless of the formulas we use. I am talking about Velixo 6’s brand-new auto-hide feature.
The feature is so powerful it definitely deserves a separate blog post. Let’s dive in!
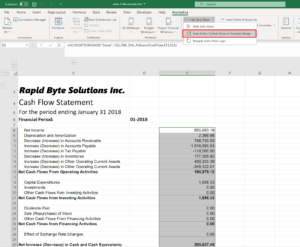
Let me introduce you to our friend, the cash flow statement.
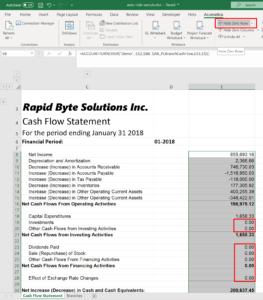
Note how it tries to be nice, but all its attempts to be appealing are completely crushed by the redundant zero rows, which make our eyes hurt and aren’t great for the environment.
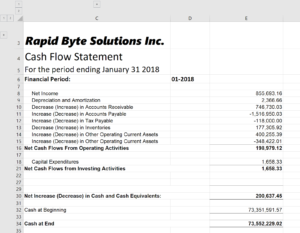
Previously, if we wanted to get rid of the zero rows in a similar report, we would highlight the range containing the amounts and press “Hide Zero Rows” on the Acumatica toolbar.
That certainly worked:
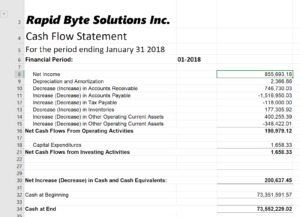
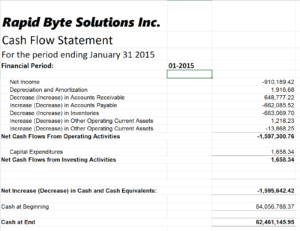
What if, however, we changed the financial period of the report?
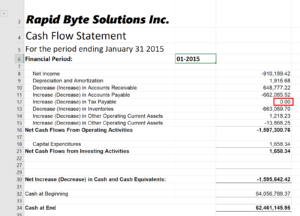
Ouch! A zero row has appeared again?
What’s even less pleasant, the values in the hidden rows (such as rows 19, 20, or 28 in the above picture) could have become non-zero – but those rows remain hidden all the same!
To avoid this issue, previously, after refreshing the report or changing its parameters, one had to do “Unhide All”:

…and then repeat the process again:
- Select the range with the relevant account balance amounts.
- Click Hide Zero Rows on the Acumatica toolbar.
It works, but it’s inhumane. It’s also really easy to forget about, ending up with multiple non-zero rows which remain hidden after a refresh.
Improving the experience around “non-dynamic Hide Zero Rows” has long been on our plate and, I’ll admit, required a significant level of ingenuity to get right, performance-wise in particular.
The result, however, is proudly presented in Velixo 6 and is called the auto-hide/unhide functionality.
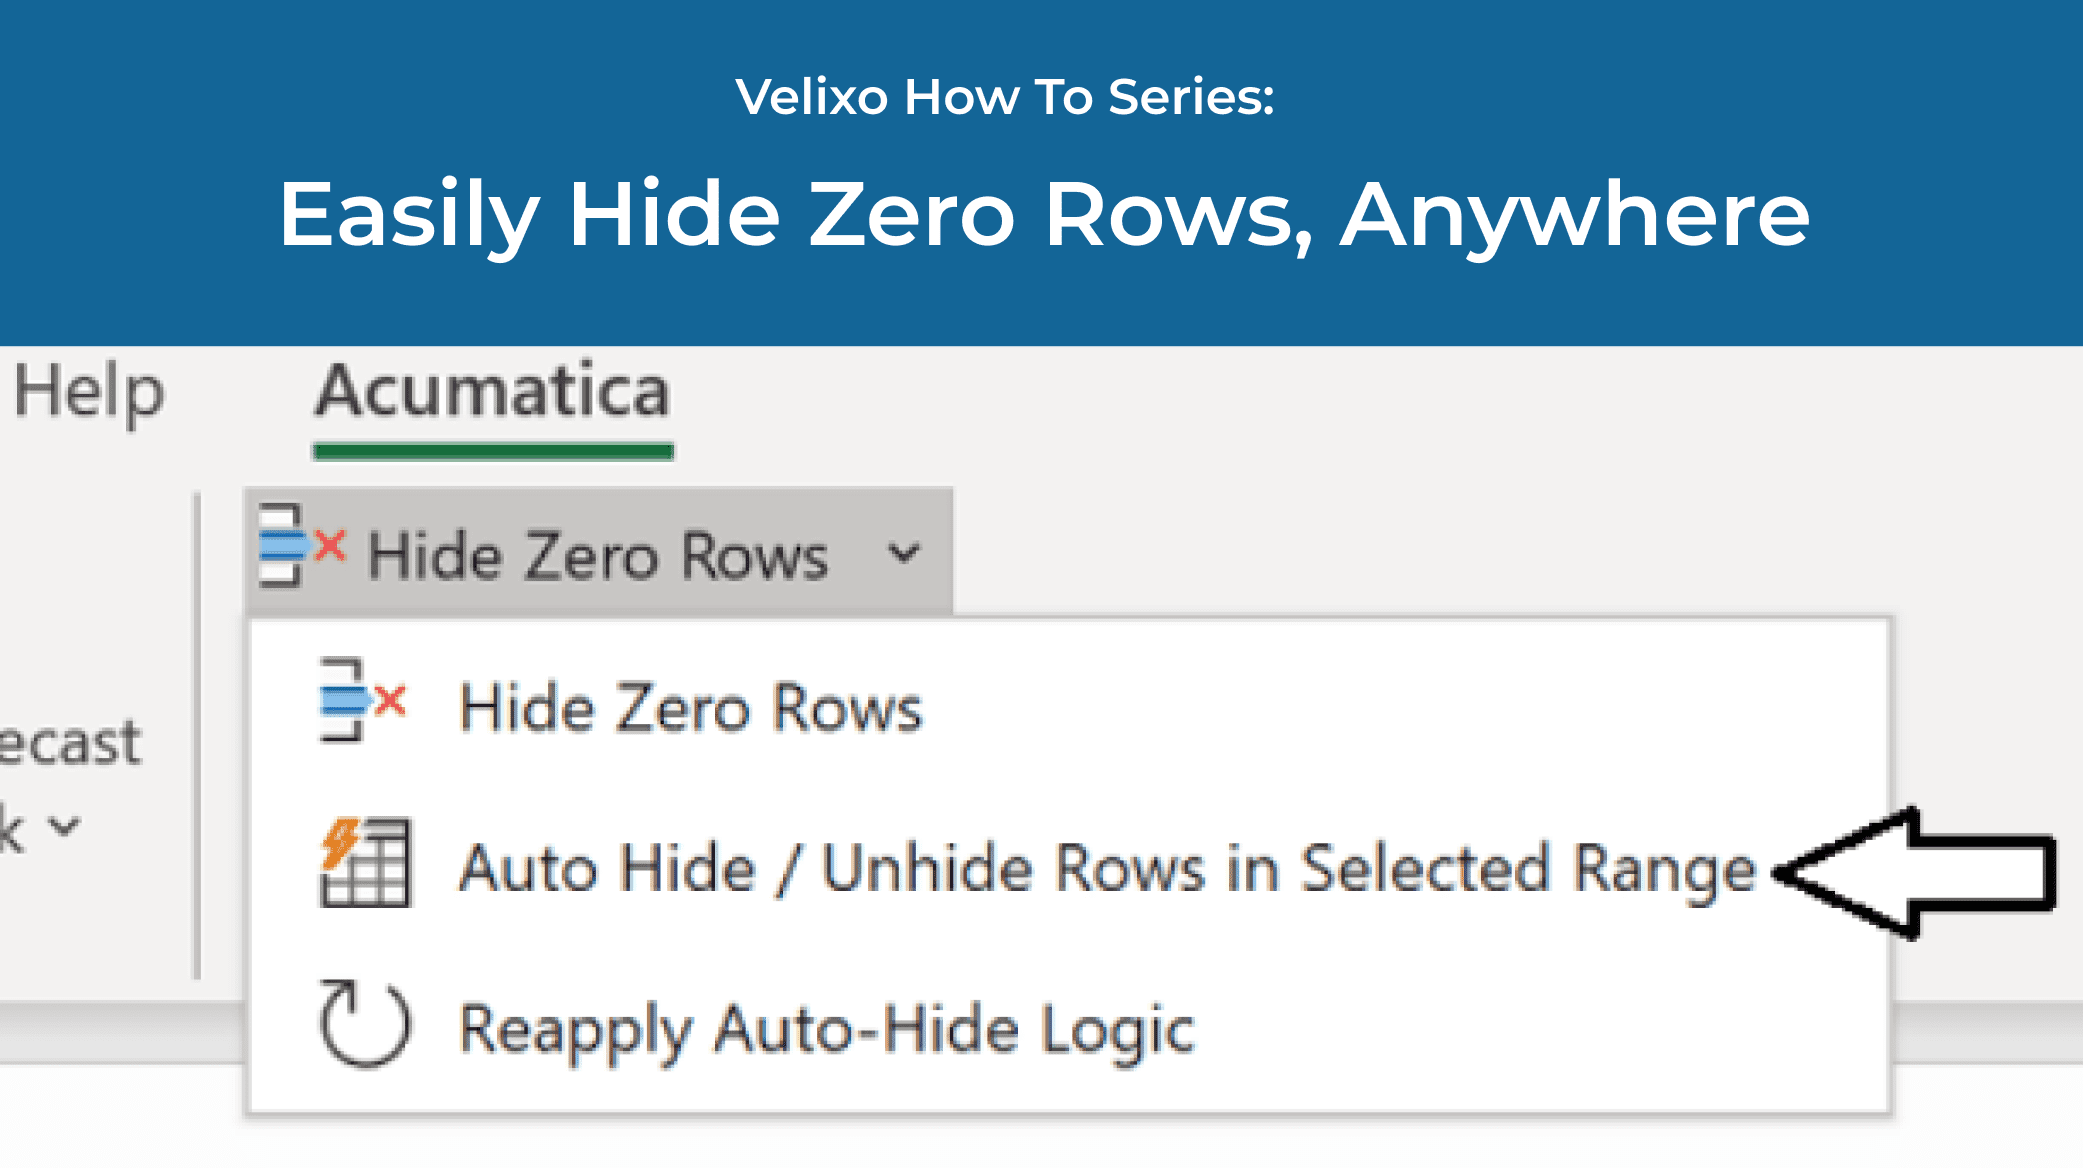
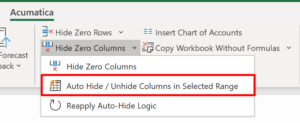
The first visual difference for the user is the button that they need to click after selecting a range. The “Auto Hide/Unhide Rows in Selected Range” button is located under a drop-down:
Whoosh.
At a first glance, it worked just like Hide Zero Rows – which is, to think of it, expected!
The difference comes later, when we change the report parameters – or do a refresh. Let’s try changing the period to 01-2015:
Hey, still no zero rows! And, what’s equally important, if any row has become non-zero after a refresh or recalculation – we can be sure that it will automatically unhide.
In other words, we don’t have to go through the loop of “Refresh -> Unhide All -> Hide Zero Rows” anymore. The Auto Hide/Unhide feature now has the range “under control”, automatically expanding and collapsing the rows after every recalculation.
Just so you know, there is a similar instrument for the columns, located under the Hide Zero Columns drop-down:
If we’d like to add more cells to the “controlled” range, we’ll just select them and press “Auto Hide/Unhide Rows in Selected Range” again. The ranges we previously selected will not go anywhere: the newly selected range will be controlled in addition to what was selected in the past.
How do we forget all auto-hide ranges for the current worksheet? Just press the “Unhide All + Forget” button, located under Unhide All’s dropdown:
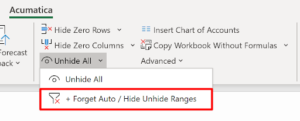
This will have an effect of expanding all hidden rows and columns on the current worksheet, and disabling Velixo’s auto-hiding feature on it.
If we are ever in doubt about what range Velixo’s auto hide/unhide feature controls, we can always review them under Formulas -> Name Manager:
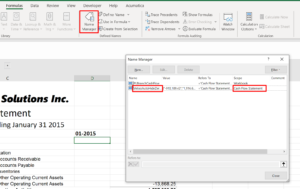
Here, we will see zero or more VelixoAutoHideZeroRows / VelixoAutoHideZeroColumns entries. Note that the name is per-worksheet, as seen from the Scope column. In other words, there will be at most one VelixoHideZeroRows or VelixoHideZeroColumns range per worksheet / tab.
We can even create or change this range directly in the Name Manager instead of using “Select Range -> Click Auto Hide/Unhide Rows”! Just edit the “Refers To” box of the named range:
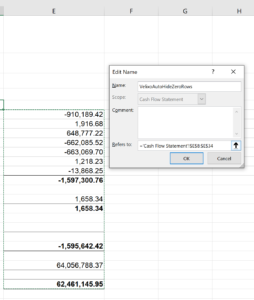
(If you ever want to create one manually though, make sure it’s worksheet-scoped and not workbook-scoped; otherwise, the functionality will not work).
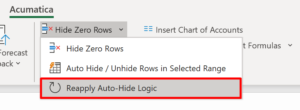
There is just one small caveat: because editing the auto-hide range from the Name Manager does not produce a recalculation event in the system, we need to let Velixo know that it needs to re-apply the auto-hide logic in the scope of the newly edited range:
To sum up, Velixo 6’s Auto Hide / Unhide feature allows us to completely mitigate the issue of zero rows and columns in our Acumatica-based Excel reports. Within the ranges we have selected for auto-hide processing, the feature works smartly: not only will it hide the zero rows or columns, but also unhide any non-zero ones – upon every update and refresh!
If we are ever in doubt which ranges are currently memorized for auto-processing, we can either:
- Press “Unhide All + Forget Auto Hide/Unhide Ranges” and start the process anew, or
- Review / edit the ranges under Formulas -> Name Manager, and then, if we changed anything, press Reapply Auto-Hide Logic.
Velixo has always taken away the tedium of building Acumatica-based or MYOB Advanced based Excel reports by providing us with the live data feed from the ERP.
Velixo 6 further improves our productivity by also automatically taking care of redundant zero rows and columns in our reports.
Focus on things that matter – for better business decisions!